Security Certificates for Infopath
Here is the procedure for importing and signing an InfoPath form with a third-party security certificate, in this case, Thawte.
The biggest advantage of having this is for the longer validity (12 months) where the form template is updated infrequently.
 |
| This is the procedure for installing a Thawte certificate with Private Key. The process should be the same for other third party certificates. |
 |
| Open InfoPath, choose Form Options. |
 |
| Select Full Trust and Then Select Certificate |
 |
| The Certificate you want to use to sign your form should show in the list. |
 |
| Highlight your chosen certificate, Click OK. |
 |
| The new certificate should show the valid expiration date. |
Do you have the private key?
Finding the solution to this took some time even though importing a certificate without a private key is a common problem. The solution is as simple as downloading the security certificate with a private key and a password - you need to go back to the issuing authority's website and re-download.
Here's a simple check you can do if you are still at a loss:
Go to Start > Run > Cmd
Type in:
certutil - repairstore my "CERTIFICATE SERIAL NUMBER"
So where do you get the Certificate Serial Number?
 |
| You will find the Certificate Serial Number stored in the Certificate Details. |
 |
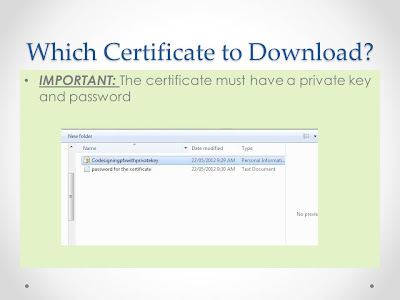
| Do as the slide says - make sure you have downloaded the Certificate with a Private Key. |
 |
| Just to re-iterate this point, I created a slide to show you that the private key will come in a separate file called "Private Key for the Certificate". Easy when you know how. |
 |
| Install the PFX and step through the wizard. |
 |
| Click Next on the Certificate Import Wizard |
 |
| If you can't remember where you saved your code-signing certificate you're on your own. |
 |
| Make sure you save your code-signing certificate in the Personal Certificate Store. |
 |
| Ready to go back to InfoPath and sign your form with your new Certificate. |


Good day. Very nice website!! Man .. Beautiful .. Wonderful .. I’ll bookmark your blog and take the feeds also…I am glad to locate numerous useful information right here within the post. Thank you for sharing.>>>
ReplyDeleteNice and informative article. I wasn't familiar with this process but now can easily import and sign an InfoPath form with a third-party security certificate. You have explained all the steps.
ReplyDeleteinfopath signing